Set of Web Services so that an application can communicate with standardized devices through Xpeak with REST calls.
It facilitates the integration of devices into web applications. For more information, click here
It facilitates the integration of devices into web applications. For more information, click here
Download all Xpeak services specifications here
Current Version: 1.8
Server configuration
The application will generate logs and read configuration from a specific folder. By default it is located in [user.home]/ws-xpeakingrest. It can be modified by setting the server's JVM startup variable xpeak.conf (-Dxpeak.conf="any directory") .
This folder contains the following:
When using tomcat, this folder will be initially created inside tomcat's bin folder. To change it, the system environment variable CATALINA_OPTS can be set to -Dxpeak.conf=DESIRED_PATH.
- db/: Containing the internal database with all the devices and their configuration.
- logs/: Containing all the logs generated by the application:
- audit/: Audit logs with the format audit.log.YYYY-MM-DD, 1 file per day with a maximum of 31 files.
- services/: General purpose application logs with the format services.log.YYYY-MM-DD, 1 file per day with a maximum of 31 files.
- xpeak/: Xpeak traces, 1 file per service and day, with a maximum of 10 files per service.
- xpeaking/: Xpeaking trace, 1 folder per service with 1 file per day with a maximum of 10 files in each one.
- services.properties: This file contains global configuration of the application. If this file is modified, the server will have to be restarted in order to load the new values. At this point it includes only one property:
- ips.allowed: which will indicate the IP address with access to the Web Services (ips.allowed=XX.XX.XX.XX,YY.YY.YY.YY,etc). If this property is empty or not present, any IP will be authorized.
When using tomcat, this folder will be initially created inside tomcat's bin folder. To change it, the system environment variable CATALINA_OPTS can be set to -Dxpeak.conf=DESIRED_PATH.
Devices configuration
The application comes with no devices configured by default. To configure devices, this web service must be used. Here there is a list with all the available services and examples of objetcs to send to the server to configure different devices:
- Barcode simulator: This will use a graphical barcode simulator, its logicalName will be BarcodeSimulador.
- Epson TMS9000MJ: This will use a physical Epson TMS9000MJ, its logicalName will be BarcodeTMS9000MJ.
- Biometric simulator: This will use a graphical biometric simulator, its logicalName will be BiometricSimulator.
- Lumidigm V203: This is the physical Lumidigm biometric, its logicalName will be BiometricV203.
- Card simulator: This will use a graphical card simulator, its logicalName will be CardSimulador.
- Epson TMS9000MJ: This is the phisical Epson card, its logicalName will be CardTMS9000MJ.*
- Seac RE800: This is the phisical Seac card, its logicalName will be CardRE800.
- Seac GenericRS232: This is the phisical Seac card, its logicalName will be CardGenericRS232.
- * DataStartSequence, DataEndSequence, Track1StartSequence, Track2StartSequence, Track3StartSequence and DelimitersToDelete will depend on the internal configuration of TMS9000MJ.
- Cash simulator: This will use a graphical cash simulator, its logicalName will be RecicladorSimulador.
- Cima AST7000NT: This is the physical Cima recycler, its logicalName will be RecicladorAST7000NT.
- Glory RZ100: This is the physical Glory recycler, its logicalName will be RecicladorRZ100.
- DeLaRue MDDM: This is the physical DeLaRue recycler, its logicalName will be RecicladorMDDM.
- Check simulator: This will use a graphical check simulator, its logicalName will be ChequeSimulador.
- Seac RE800: This is the physical Seac check reader, its logicalName will be ChequeRE800.
- Seac GenericRS232: This is the physical Seac check reader, its logicalName will be ChequeGenericRS232.
- Bancor K2S: This is the physical Bancor check reader, its logicalName will be ChequeK2S.
- Epson TMS1000: This is the physical Epson TMS1000 check reader, its logicalName will be ChequeTMS1000.
- Verifone ServusI: TThis is the physical Verifone ServusI display, its logicalName will be VerifoneServusI.
- Olivetti PR2: This is the physical Olivetti PR2 printer, its logicalName will be FinancieraPR2.
- Epson PLQ20M: This is the physical Epson PLQ20M printer, its logicalName will be FinancieraPLQ20M.
- Epson TMS9000MJ: This is the physical Epson TMS9000MJ printer, its logicalName will be RecibosTMS9000MJ.
- Scanner simulator: This will use a graphical scanner simulator, its logicalName will be ScannerSimulador.
- Bancor K2S: This will use a physical Bancor K2S scanner, its logicalName will be ScannerK2S.
- Epson TMS9000MJ: This will use a physical Epson TMS9000MJ scanner, its logicalName will be ScannerTMS9000MJ.
- Verifone ServusI: TThis is the physical Verifone ServusI security, its logicalName will be VerifoneServusI.
- Signature simulator: This will use a graphical signature simulator, its logicalName will be FirmasSimulador.
- Wacom STU500: This will use a physical Wacom STU500 signature, its logicalName will be FirmasSTU500.
Examples
Example of printing forms with the Olivetti PR2
It will be necessary to send the next object as parameter of the web service /printer/print:Example of reading a check with the SEAC RE800
After issuing an /check/enableInsert the check can be read through the web service /check/read. The following query parameters can be used:logicalName: Chequere800
user: Test user
format: 117834107 (XPEAK_GRAPHIC_FORMAT_NONE)
front: false
back: false
Example of dispense with the Xpeak's Cash Simulator
It will be necessary to send the next parameters with the web service /cash.json/dispense:logicalName: Recicladorcashsimulator
user: Test user
algorithm: 0
present: true
position: 117833927
timeout: 30000
currency: EUR
amount: 35
allowPartialDispense: true
Example of deposit and acceptDeposit with cash simulator
It will be necessary to send the next parameters with the web service /cash.json/deposit:logicalName: Recicladorcashsimulator
user: Test user
timeout: 30000
logicalName: Recicladorcashsimulator
user: Test user
timeout: 30000
- 1 of 5€
- 2 of 10€
- 3 of 20€
- 4 of 50€
- 5 of 100€
Diagrams
Sequence of a successful print operation
This example shows the complete flow required to correctly print on a page.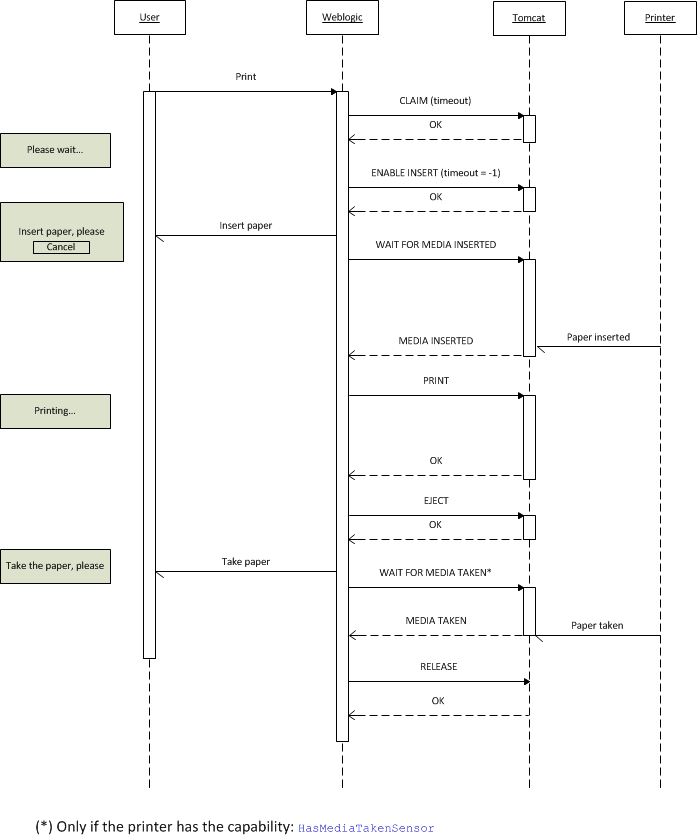
Sequence of a canceled print operation
This example shows the flow generated by a user who cancels the print operation before inserting any paper.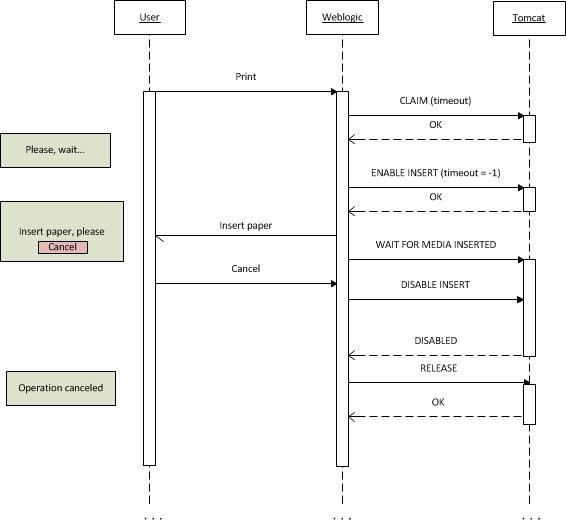
Sequence of an unsuccessful print operation
This example shows the flow generated by a hardware failure during a print operation.
Sequence of a print operation of several pages
This example shows the flow generated by issuing some prints on different pages.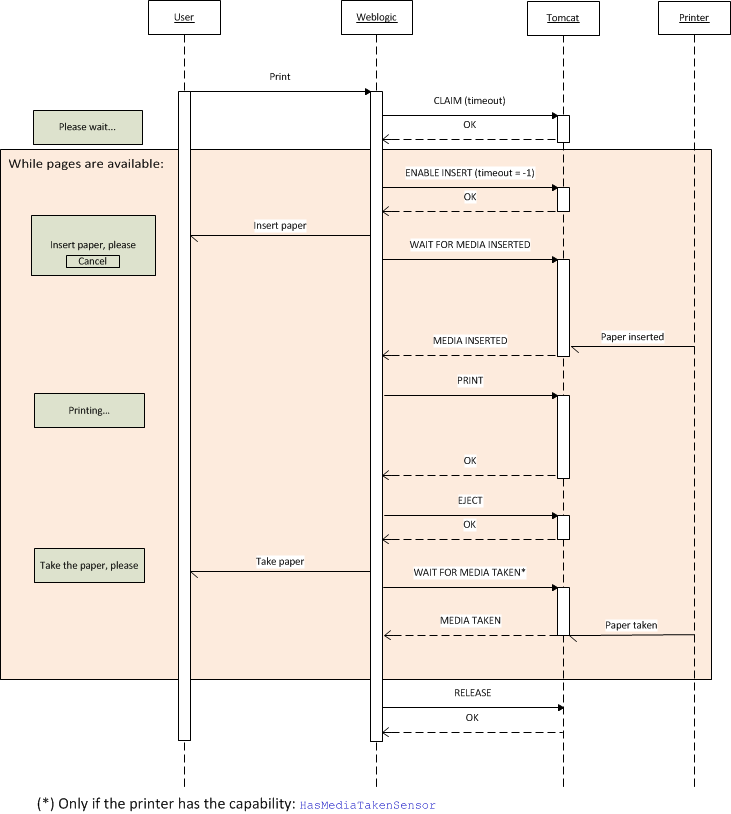
Sequence of a successful read operation
This example shows the complete flow required to correctly read a check.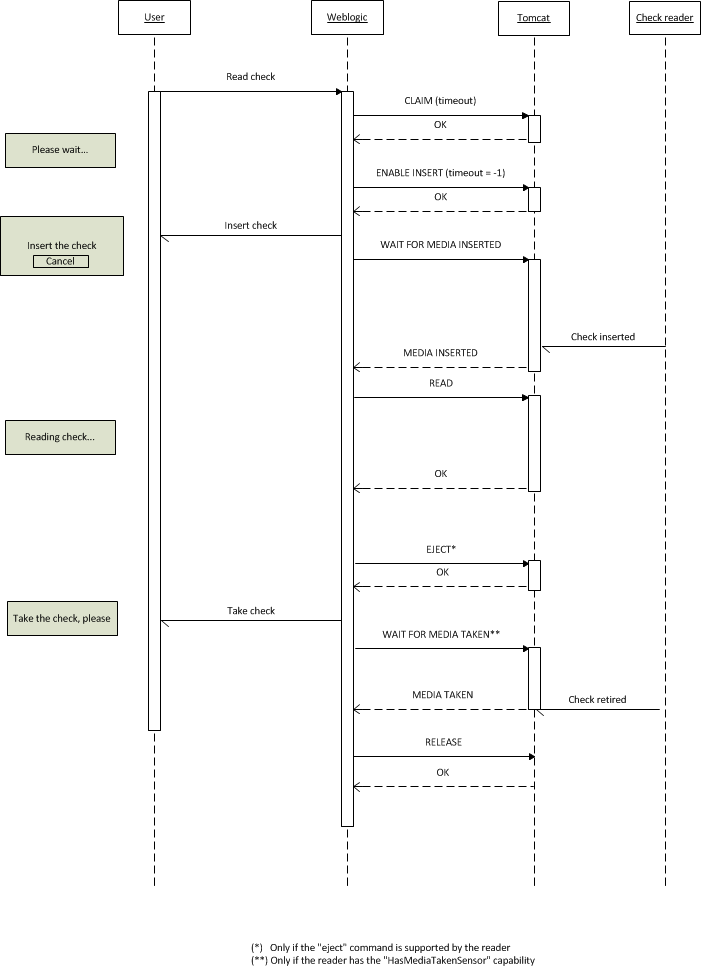
Sequence of a canceled read operation
This example shows the flow generated by a user who cancels the read operation before inserting any check.
Sequence of a successful dispense operation
This example shows the complete flow required to correctly dispense cash.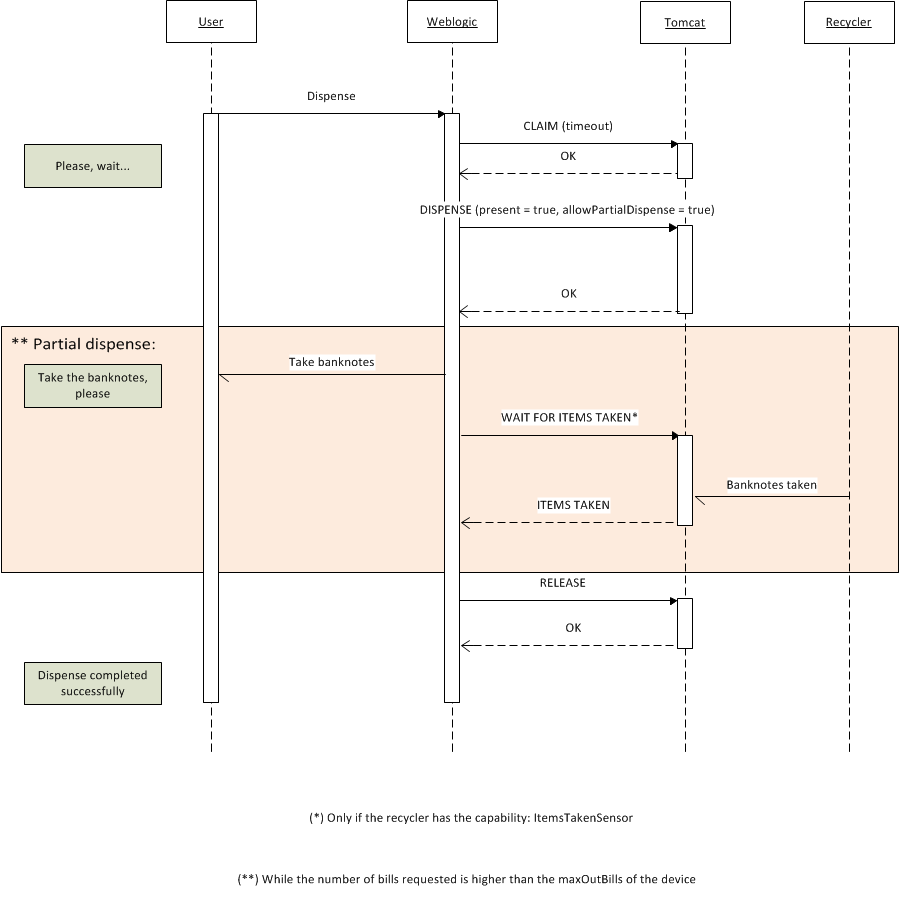
Sequence of a successful deposit operation
This example shows the complete flow required to correctly deposit cash.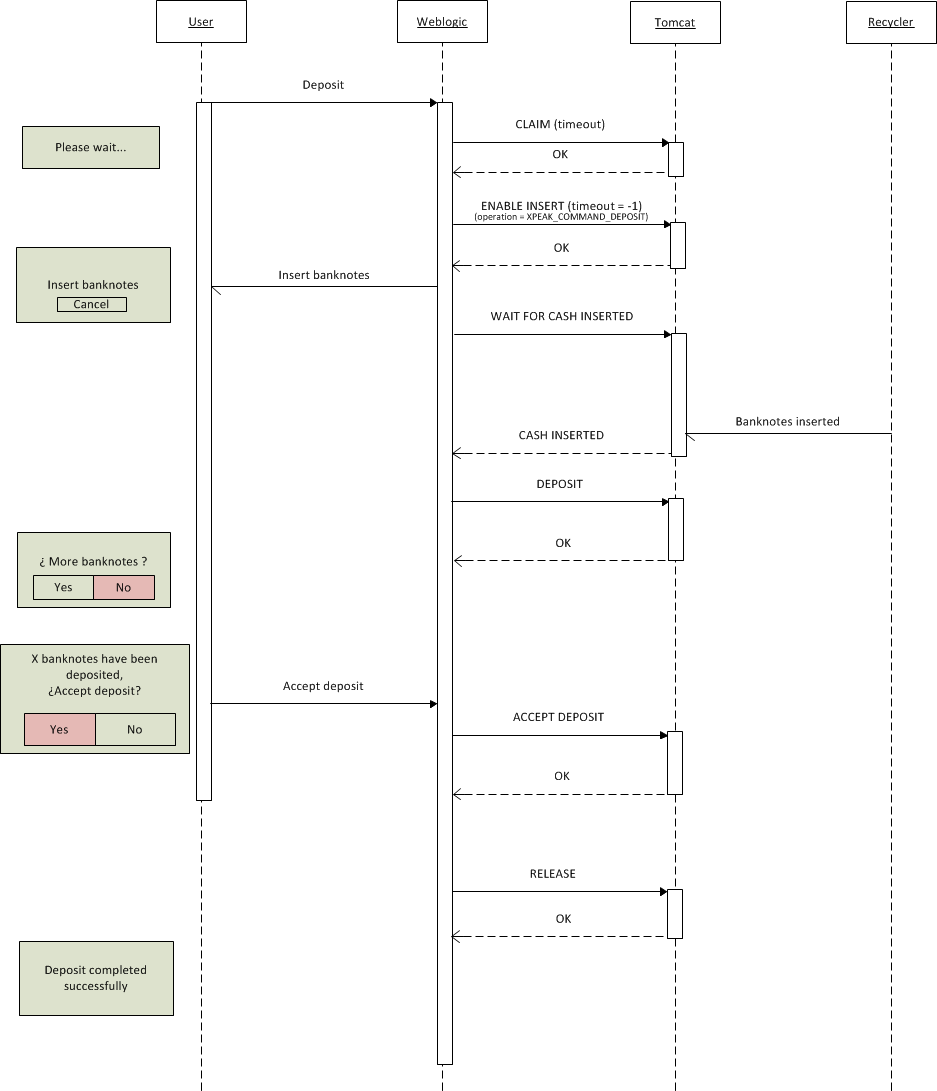
Sequence of a successful deposit (with rejected items) operation
This example shows the complete flow required to correctly deposit cash and handle rejected items.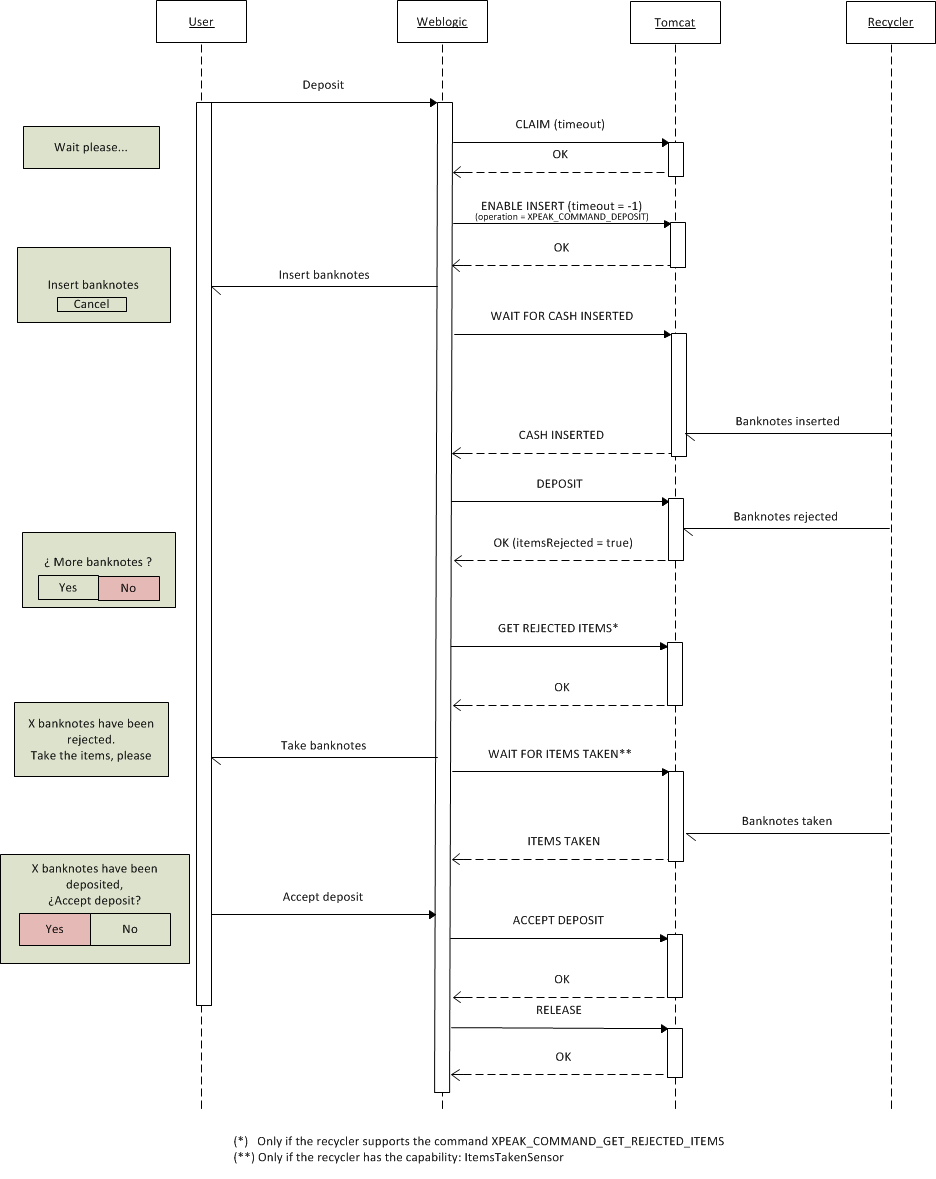
Sequence of a successful deposit (with partial insertions) operation
This example shows the complete flow required to correctly deposit cash.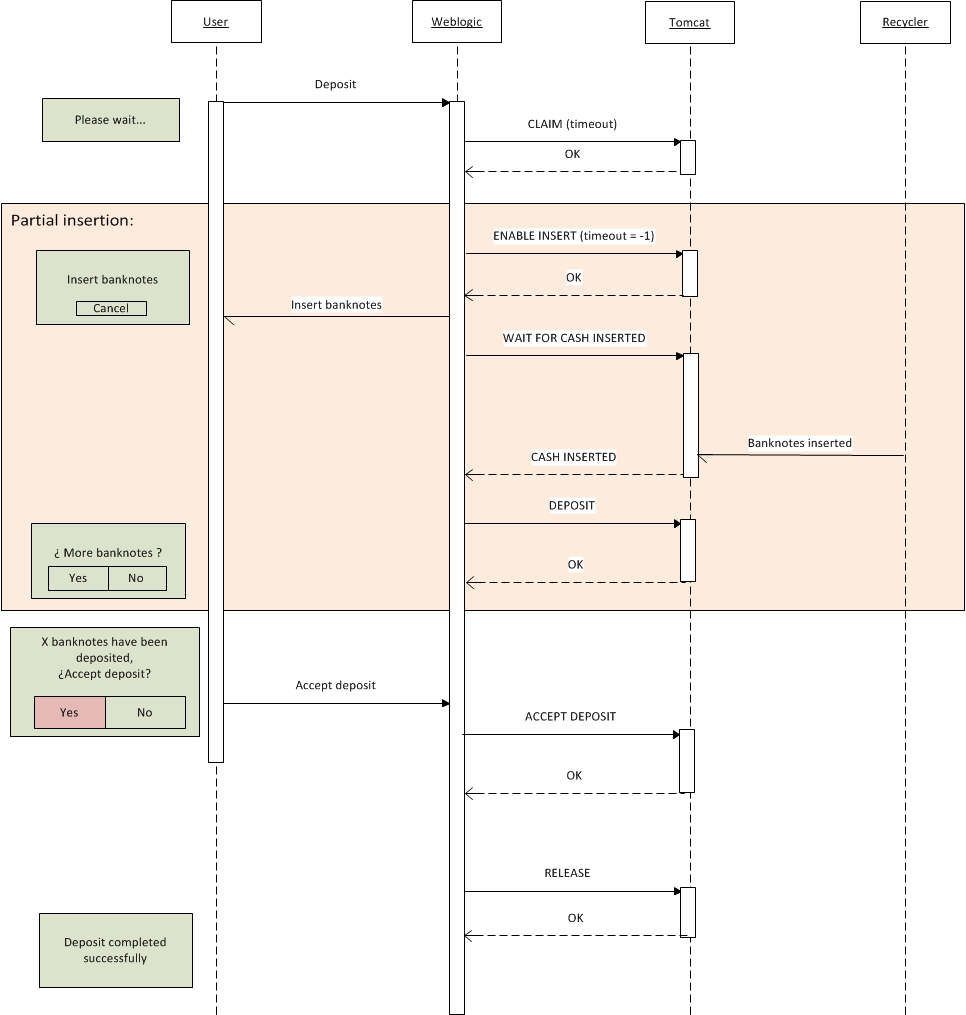
Sequence of a canceled deposit operation
This example shows the flow generated by a user who cancels the deposit operation before inserting cash.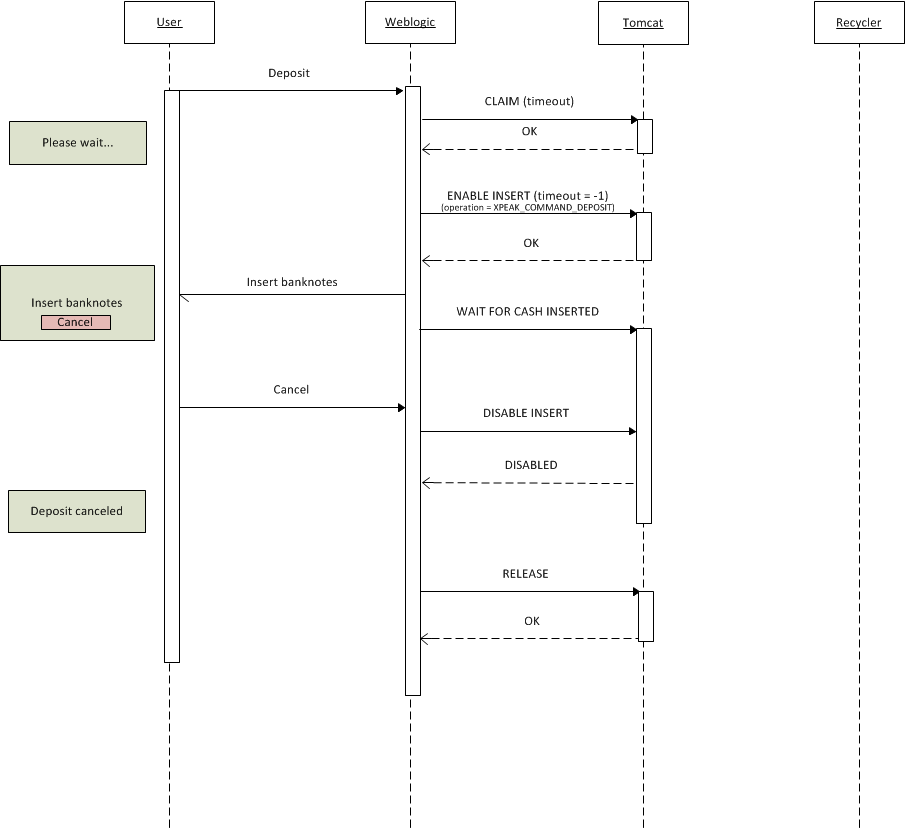
Sequence of a canceled deposit operation (2)
This example shows the flow generated by a user who cancels the deposit operation after inserting cash.
Sequence of a empty cash unit operation
This example shows the complete flow required to correctly empty a set of cash units.Sequence of a count banknotes operation
This example shows the complete flow required to correctly count cash.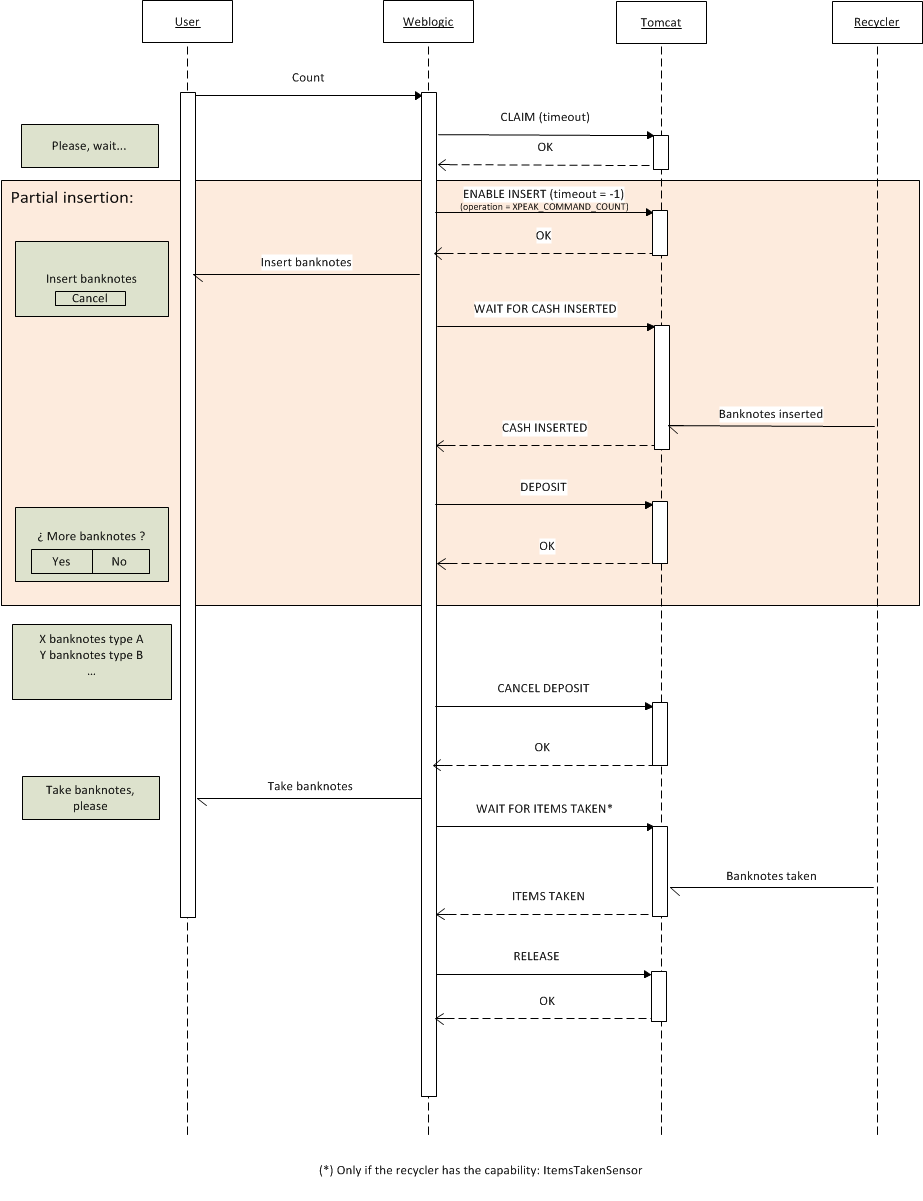
Sequence of a count banknotes operation
This example shows the complete flow required to correctly count cash.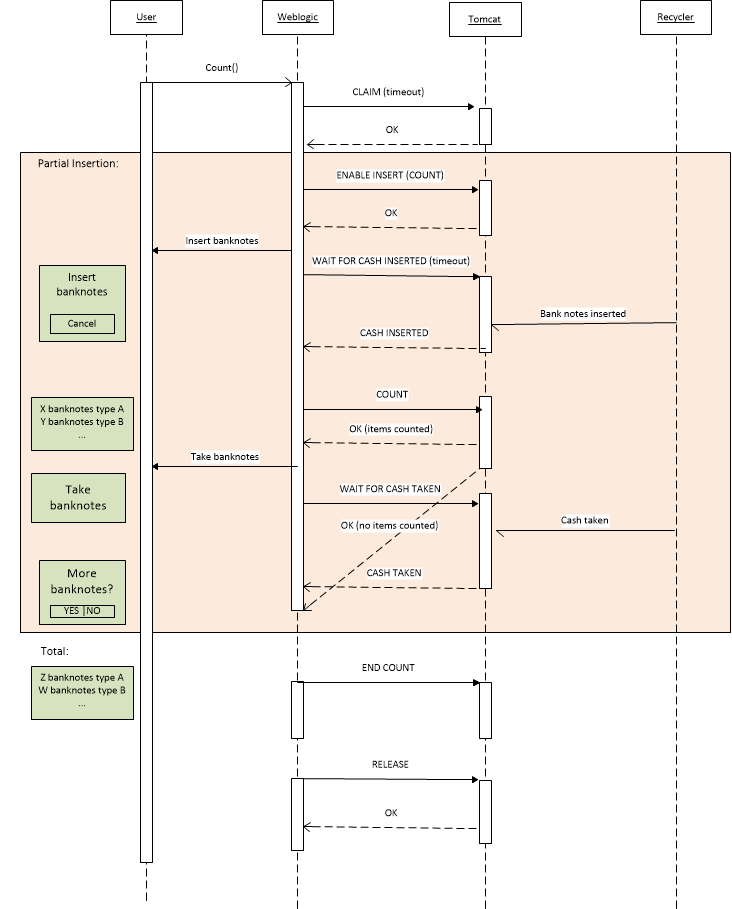
Sequence of a manual maintenance
This example shows the complete flow required to execute manual maintenance operations.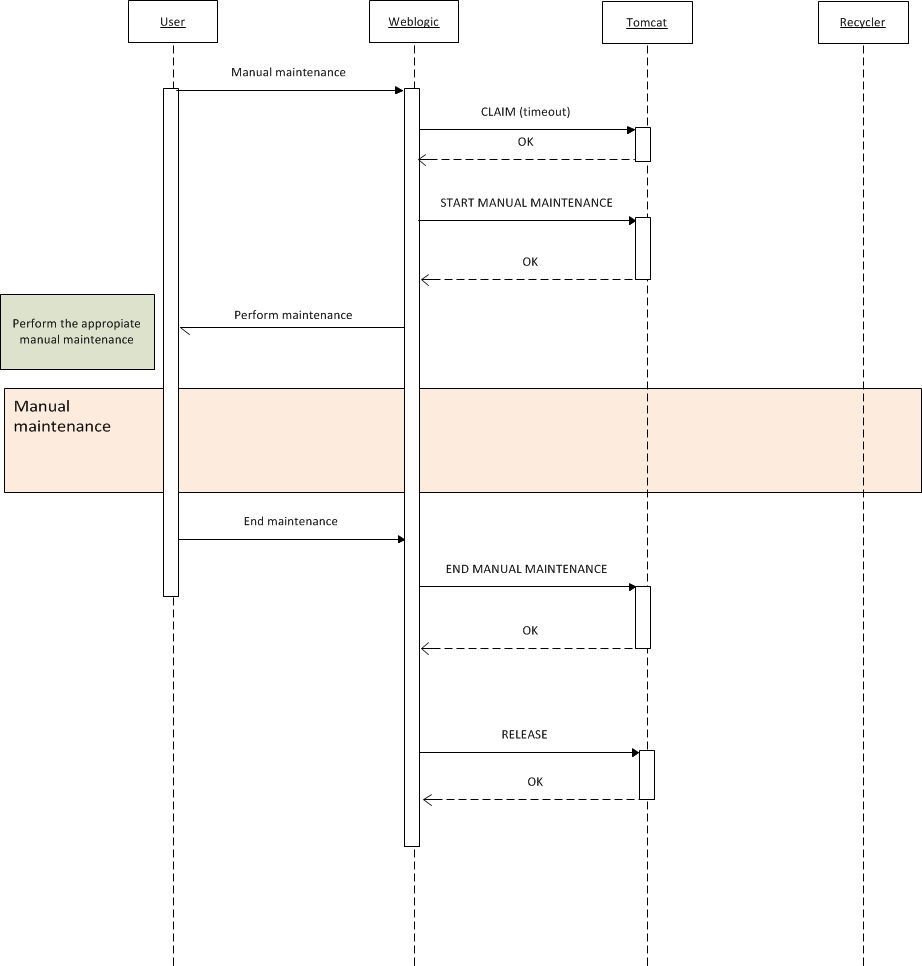
Sequence of a exchange operation
This example shows the complete flow required to execute an exchange operation.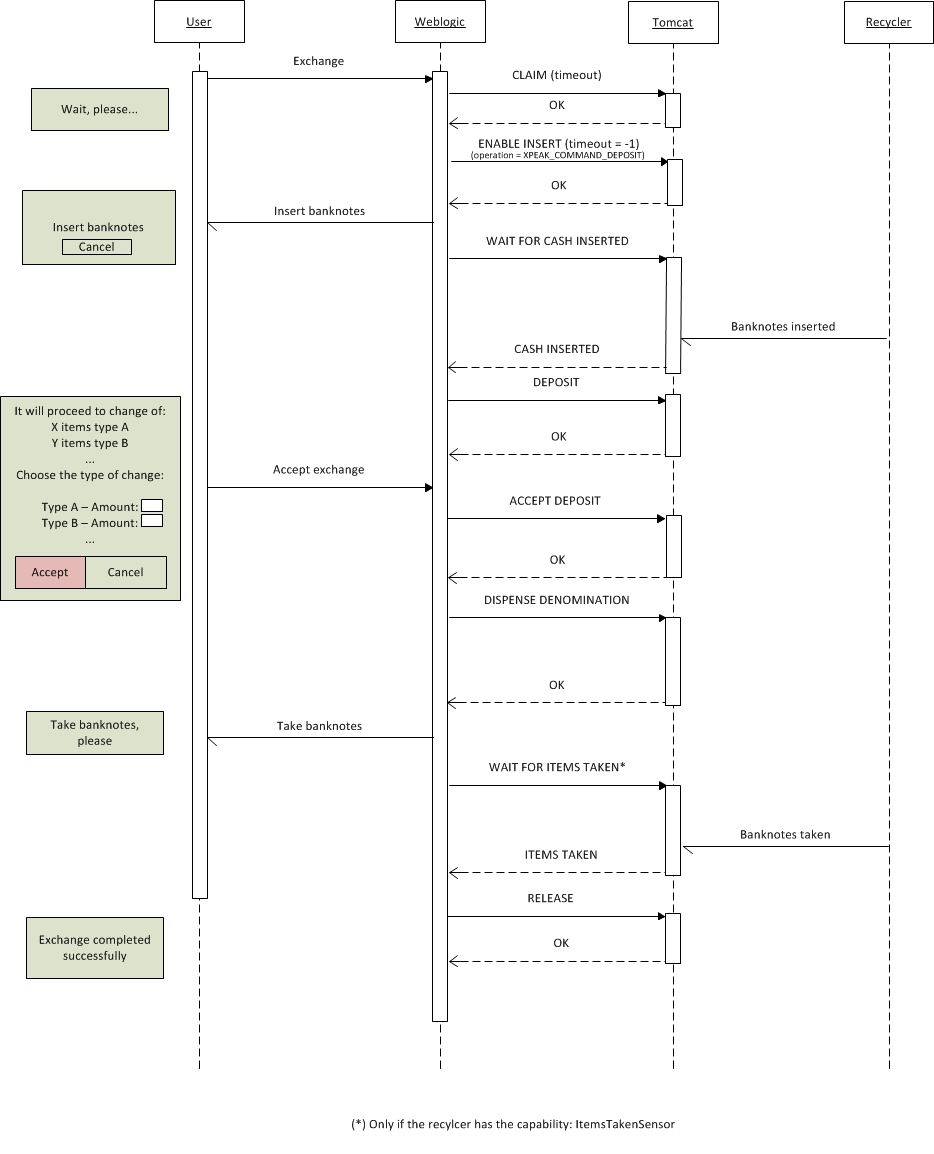
Sequence of a successful claim operation by a second user
In this example the user A claims the device and executes a sequence of commands before releasing it. While this, the user B executes a Claim (Timeout infinite) thus taking the control of the device when the user A releases it.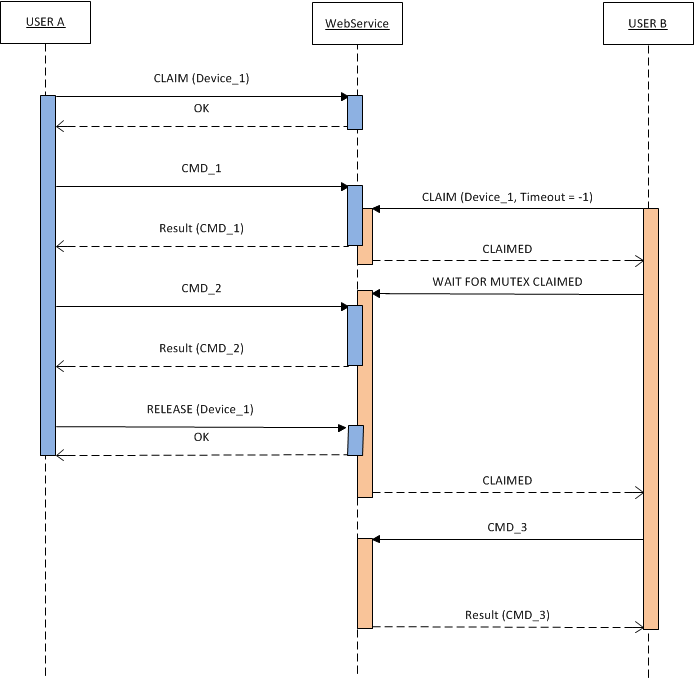
Sequence of a unsuccessful claim operation by a second user
In this example the user A claims the device and executes a sequence of commands before releasing it. While this, the user B executes a Claim (Timeout 20) which fails because the timeout exceeds before the user A releases it.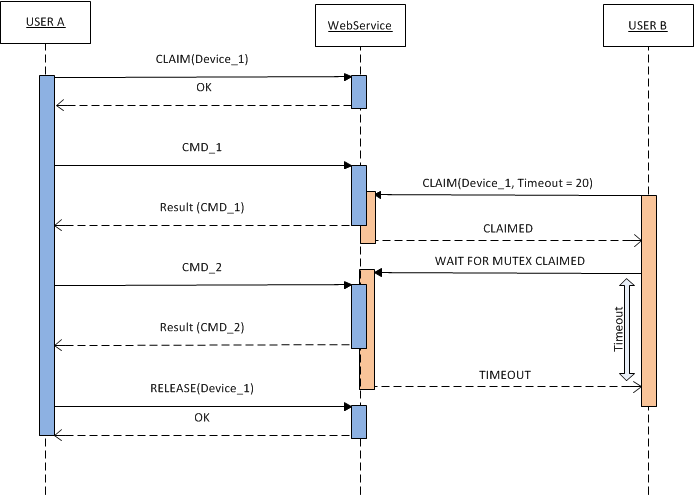
Sequence of a claim forced by a second user
In this example the user claims a device which turns out to be claimed by another user. However, this user knows that the device is not being used by anyone and decides to force his claim operation.
Sequence of a claim canceled by an user
In this example the user claims a device which turns out to be claimed by another user. The user decides to cancel the claim.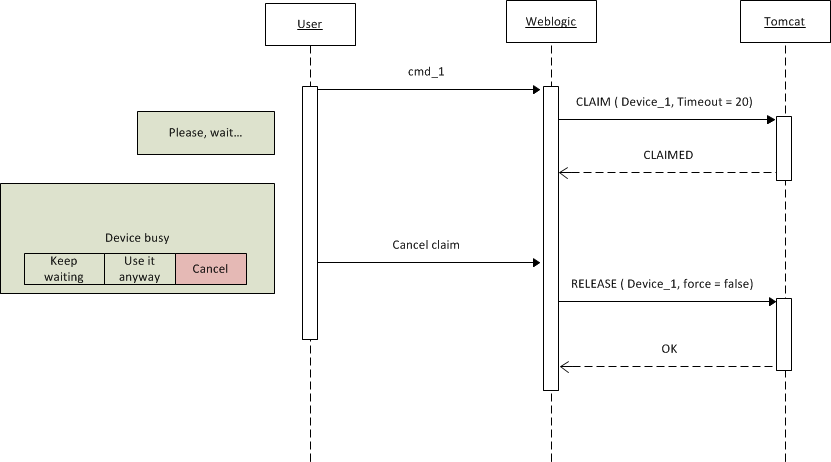
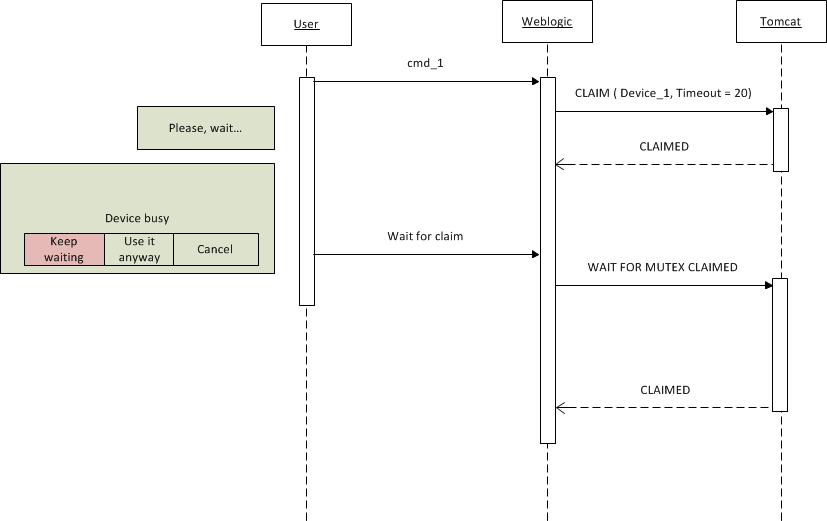
Sequence of a claim with waiting by an user
In this example the user claims a device which turns out to be claimed by another user. The user decides to keep waiting for the claim.